あの有名な「アプリを探すならアプリヴ」で私が開発したアプリを紹介していただきました!
株式の配当管理をするiOSアプリになります!
少しずつ機能を増やし改善していきたいと思います!
#iOS
#アプリヴ
#アプリブ
#appliv
#株
#配当管理
#配当
#配当落ち

あの有名な「アプリを探すならアプリヴ」で私が開発したアプリを紹介していただきました!
株式の配当管理をするiOSアプリになります!
少しずつ機能を増やし改善していきたいと思います!
#iOS
#アプリヴ
#アプリブ
#appliv
#株
#配当管理
#配当
#配当落ち
pod 'Alamofire'import Alamofire//OpenAI
struct OpenAIConfiguration {
let apiKey: String
}
let configuration = OpenAIConfiguration(apiKey: "hage")
func generateTranslationPrompt(inputText: String) -> String {
let promptTemplate = "xxxxxしろや。: \(inputText)"
return promptTemplate
}
func callText(model: String,inputText: String, completion: @escaping (String?, Error?) -> Void) {
let prompt = generateTranslationPrompt(inputText: inputText)
let messages: [[String: Any]] = [
["role": "system", "content": "あなたはxxxxxです。"],
["role": "user", "content": prompt]
]
let parameters: [String: Any] = [
"model": model,
"messages": messages,
"temperature": 0.3,
"top_p": 1.0,
"frequency_penalty": 0.0,
"presence_penalty": 0.0
]
let headers: HTTPHeaders = [
"Authorization": "Bearer \(configuration.apiKey)"
]
AF.request("https://api.openai.com/v1/chat/completions", method: .post, parameters: parameters, encoding: JSONEncoding.default,
headers: headers).responseJSON { response in
switch response.result {
case .success(let value):
if let jsonResponse = value as? [String: Any],
let choices = jsonResponse["choices"] as? [[String: Any]],
let firstChoice = choices.first,
let message = firstChoice["message"] as? [String: Any],
let text = message["content"] as? String {
completion(text, nil)
} else {
completion(nil, NSError(domain: "", code: 0, userInfo: [NSLocalizedDescriptionKey: "Failed to parse response"]))
}
case .failure(let error):
completion(nil, error)
}
}
}そんで呼びたいところで使う
let orgString = "おはよう"
        callText(model: "gpt-3.5-turbo",inputText: "\(orgString)") { (convertText, error) in
            if let error = error {
                print("Error1: \(error)")
            } else if let convertText = convertText {
                print("Translated text: \(convertText)")
            }
}ひらがなやカタカナをアルファード(ローマ字)に直すサービスをリリースしました!!!
iOSを1年ぶりに触ったら下記の通りエラー
pod update
[!] `GoogleAppMeasurement` requires CocoaPods version `>= 1.10.2`, which is not satisfied by your current version, `1.10.1`.
cocoapodsのバージョンをあげる
sudo gem install cocoapods
ERROR: While executing gem … (Gem::FilePermissionError)
You don’t have write permissions for the /usr/bin directory.
一応成功
sudo gem install cocoapods -n /usr/local/bin
まず「検索」欄に「^$」と入力します。
そして「正規表現を使用した検索」にチェックを入れます
自動的に「大文字と小文字の区別」にもチェックが入ります。
これで検索できます。
最近、パイソン(Google Codelabs)を始めましたのでその備忘録。
下記で 90分制限を回避できる。[2021/5/14現在]
function ConnectButton(){
console.log("Connect pushed");
document.querySelector("#connect").click()
}
setInterval(ConnectButton,60000);久しぶりに毒林檎を弄ったので備忘録として。
Objective-c から Swift
//Need

//Call From Objective-C To swift

#import "MyApp-Swift.h"
SwiftからObjective-c
import Foundation

//obj-cからアクセスするのに必要
@objcMembers
class SharedInfos: NSObject {
    static let shared: SharedInfos = SharedInfos()

    func someFlag() -> Bool {

            return true
        }

}
Herokuより、mlabを2020年11月10日にHerokuアプリから削除するとのメールが来ました。
https://docs.mlab.com/shutdown-of-heroku-add-on/
抜粋
| The mLab team has chosen to discontinue this add-on. The mLab MongoDB add-on will be removed from all Heroku apps on November 10, 2020. We advise you to remove the mLab MongoDB add-on yourself before September 1, 2020 via the Dashboard or the CLI. |
Appleにアプリを消されてしまい、もうほとんどアプリ開発はしてませんがまだ利用している方がいてそこから少しだけ広告収益があります。
Heroku はシャットダウン予告のメールの中で別の MongoDB Add-on の「ObjectRocket」への移行を提案していますが費用が発生してしまいます。
収益はAppleのせい(笑)で少ない為、費用を抑えたい!ですから今回は無料 Sandbox があるAtlas にします。
https://www.mongodb.com/cloud/atlas
移行に関しては下記2記事を参考にしてとてもわかりやすかったです。そして移行そのもは今回は割愛します。ありがとうございました!
https://mikan.github.io/2020/07/11/migrate-heroku-mlab-to-mongodb-atlas/
今回、最後の接続の中でheroku側に下記のエラーが出てアプリ側と接続ができませんでした。
Error: invalid schema, expected mongodb at module.exports
調べてみるとparse serverのバージョンを最低でも2.8.4に上げなければいけないとのこと。
ちゃんと調べましょう。。。
https://docs.mlab.com/how-to-migrate-to-atlas/
package.jsonをみると2.2.12になってた(約4年前のバーション、、、)
今回は3.0.0に変更
そしてconfig varにDATABASE_URIを使用するためにgithub上のコード(index.js)とherokuのconfig varを編集。MONGODB_URIは移行が完了して確認したら削除する。

ひとまずこれでエラー回避し接続できます!
自サイトへのお問い合わせにさくっとしたものが欲しくなって作りその備忘録になります。
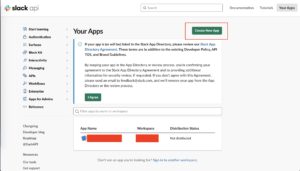
起動したフォームに値を入力してCreate Appから登録します。

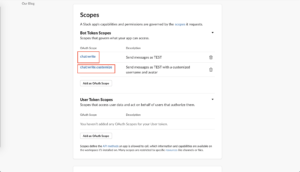
メニューからOAuth & Permissionsを選択します。
下にスクロールし、Scopesメニューから権限を追加します。
今回は最低限必要な以下の2つの権限をAdd an OAuth Scopeから設定します。
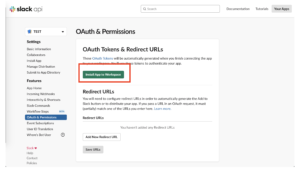
メニューからInstall Appを選択し、Install App to Workspaceをクリックします。
トークンが発行されます。
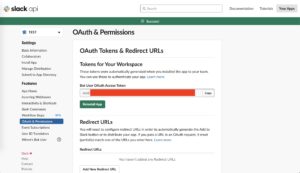
これでアプリの準備が出来ました。
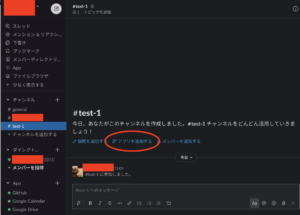
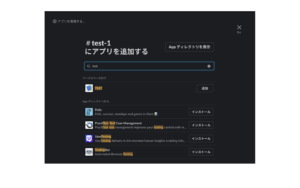
作成したアプリをメッセージ送信したいチャンネルに追加します。
まずはSlackの公式サイトからテストを実行することができます。
以下のURLにアクセスしテスト送信します。
https://api.slack.com/methods/chat.postMessage/test
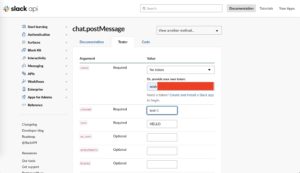
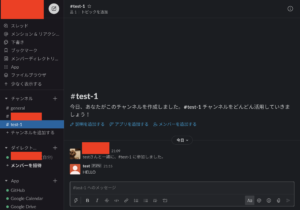
以上でテストと準備になります。
<div class="comment-form">
<h3>Contact us</h3>
<div class="row">
<div class="col-md-6">
<div class="form-group">
<input type="text" id="name" class="form-control" placeholder="NAME" aria-label="Name">
</div>
</div>
<div class="col-md-6">
<div class="form-group">
<input type="email" id="mail" class="form-control" placeholder="E-MAIL">
</div>
</div>
<div class="col-md-12">
<div class="form-group">
<textarea class="form-control" id="text" placeholder="Message"></textarea>
</div>
</div>
<div class="col-md-12">

<input class="originalButton" type="button" style="background:#00c0f0;color:#ffffff;" value="Submit Now" onclick="send(document.getElementById('name').value,document.getElementById('mail').value,document.getElementById('text').value)">
</div>
</div>
</div>
const send = (name,mail,text) => {
// console.log("POSTtext---"+text);
// console.log("POSTmail---"+mail);
// console.log("POSTname---"+name);
if(name == "" || mail == "" || text == ""){
return alert("必須項目を入力して下さい。");
}
fetch(`/api/sendSlack?text=${text}&mail=${mail}&name=${name}`)
};const express = require("express");
const router = express.Router();
//Slackに投稿
router.get('/sendSlack',async function(req,res){
var request = require("request")
var text = req.query.text;
var name = req.query.name;
var mail = req.query.mail;
// slack連携
request.post('https://slack.com/api/chat.postMessage', {
form: {
token: 'xoxbXXXXXXXXXXXXXXXXXXX', // slackのトークン
channel: 'test-1', // slackのチャンネル名
username: name, // slackに投稿される名前
text: 'mailto:'+mail+`
`+ text,
}
}, function (error, response, body) {
})
})
module.exports = routerアンドロイドで簡単に決まった時間、遅延処理をしたいとき用
// 3秒後に処理を実行する

new Handler().postDelayed(new Runnable(){

@Override public void run() {

// TODO: ここで処理を実行する

} }, 3000);